Custom Domain
You can set up your checkout pages in CheckoutJoy to be hosted on a custom domain (typically a subdomain of your main website). This approach keeps your customers on your branded domain throughout the entire purchasing process, creating a seamless and professional checkout experience.
This feature is available on the Pro plan and above. If you are on the Essential plan, you can upgrade to Pro to access this feature.
How Custom Domains Work
When you implement a custom domain, you're creating a subdomain of your main website's domain that will be dedicated specifically to your checkout process. This approach maintains brand consistency and builds customer trust throughout the entire purchasing journey.
For example, if your primary website is:
https://www.mycourses.comYour checkout subdomain could be:
https://checkout.mycourses.comThis guide will walk you through the complete process of setting up your custom domain with CheckoutJoy, from initial configuration to implementation.
Setting Up Your Custom Domain
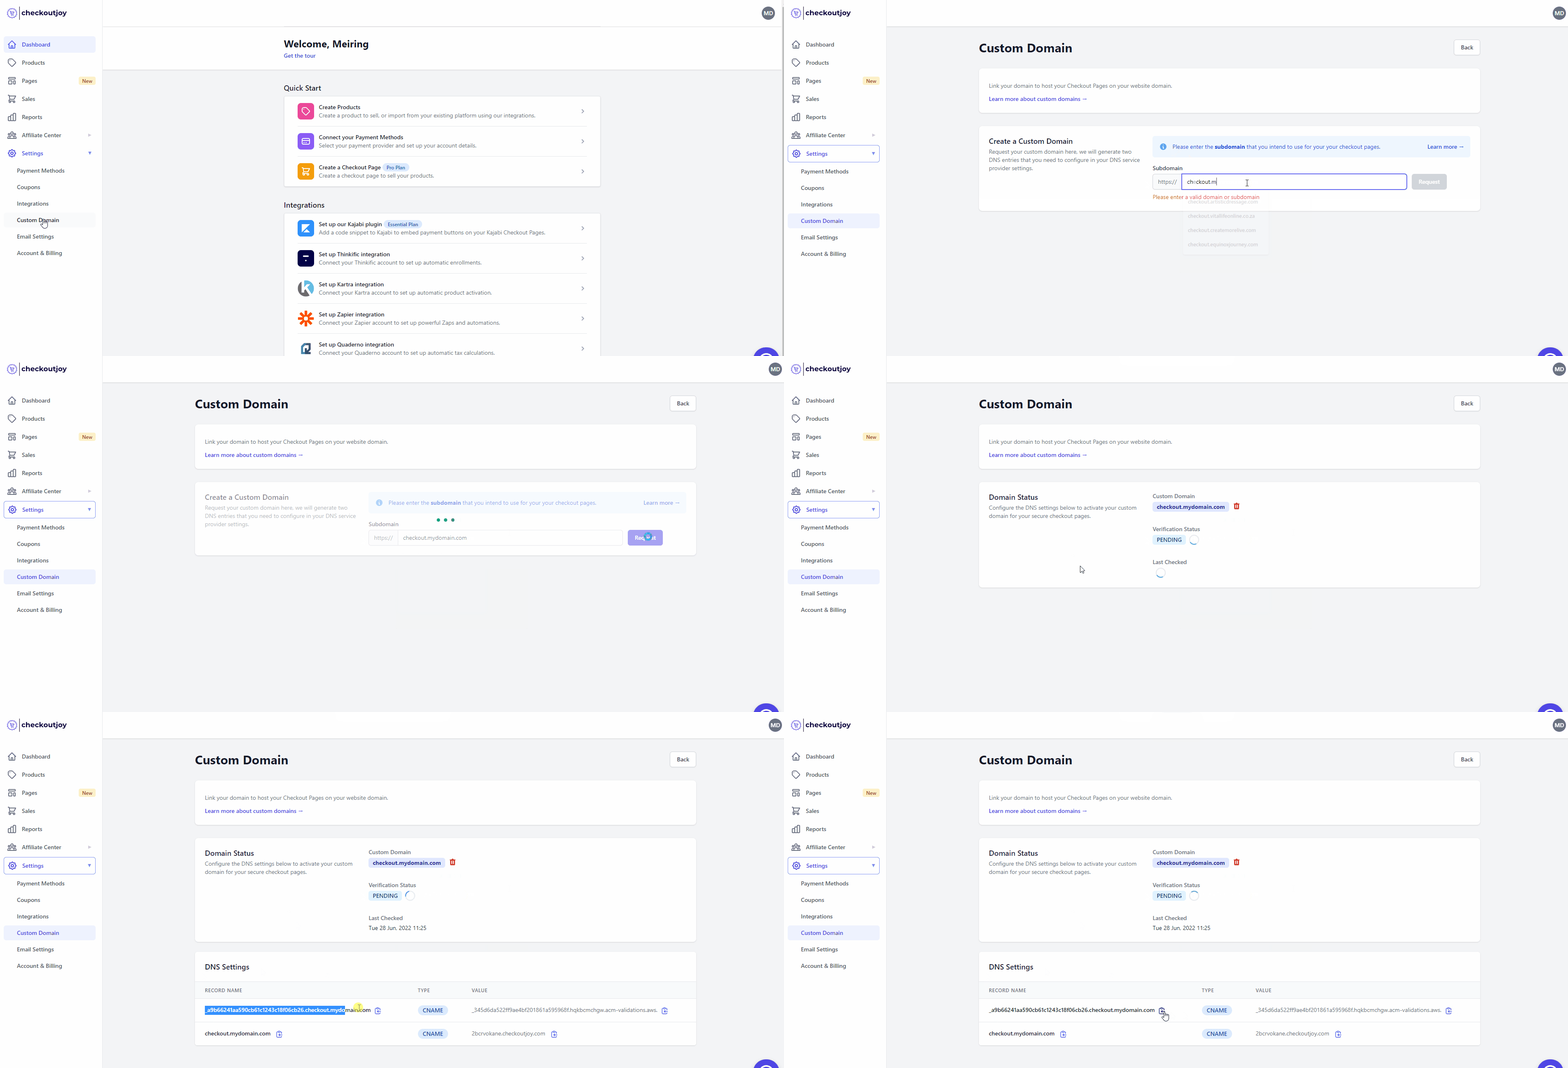
Step 1: Creating a Custom Domain in CheckoutJoy
You don't need to manually create a subdomain in your hosting provider (like GoDaddy or CloudFlare). Simply follow the steps below and add the two DNS entries to your DNS configuration, and the subdomain will be automatically created.
To request a new custom domain in CheckoutJoy:
- Navigate to
Settings > Custom Domainin your CheckoutJoy dashboard - Enter the subdomain you want to create (this should be a new subdomain that doesn't already exist and should not be the same as your website's primary domain)
- Wait for your DNS settings to be displayed on-screen

After completing these steps, CheckoutJoy will generate two important DNS records:
-
Domain Verification Record: This record proves your ownership of the domain (your ability to add this entry to your DNS settings demonstrates that you control the domain). CheckoutJoy requires this verification to generate a free SSL certificate for your new domain, ensuring secure connections for your customers.
-
Subdomain Pointer: This record directs your subdomain to CheckoutJoy's servers where your checkout pages are hosted. This establishes the actual connection between your domain and the CheckoutJoy platform.
Step 2: Adding the CNAME Entries to Your DNS Settings
After generating the DNS records in CheckoutJoy, you'll need to add these entries to your domain's DNS configuration. This step takes place outside of CheckoutJoy, in your domain management platform.
To complete this step:
- Log in to your domain management platform where you configure DNS settings
- Locate the DNS management section
- Add both CNAME records exactly as provided by CheckoutJoy
Common locations for DNS management depending on your setup include:
- Kajabi dashboard under Settings > Domains
- GoDaddy DNS Management
- CloudFlare DNS Configuration
- Afrihost Domain Control Panel
- Your web hosting provider's control panel
Important notes:
- Ensure you add these as CNAME records (not A records or other types)
- You're adding new DNS entries, so this won't affect your existing website configuration
- There's no need to modify any of your existing DNS settings
Step 3: Implementing Your Custom Domain
Once your custom domain is set up and the DNS changes have propagated, you're ready to start using your branded checkout experience. This process involves redirecting your customers to CheckoutJoy's checkout pages instead of your platform's default checkout pages.
To implement your custom domain:
- Update your call-to-action (CTA) buttons (such as
Buy Now,Subscribe, orCheckoutbuttons) on your website to point to your new CheckoutJoy checkout pages - Replace any checkout links in your marketing materials, emails, or social media with your custom domain checkout links
Most e-commerce and content platforms allow you to customize button destinations by entering an external URL. Simply update these settings to use your new custom domain checkout URL.
After implementing your custom domain, we recommend testing the complete checkout process to ensure a seamless experience for your customers. Make a test purchase to verify that everything works correctly from start to finish.
Benefits of Using a Custom Domain
By implementing a custom domain for your checkout process, you'll enjoy several advantages:
- Enhanced Brand Trust: Keeping customers on your domain throughout the entire purchase journey builds confidence and reduces abandonment
- Seamless User Experience: Customers experience a consistent branded journey without jarring domain changes
- Professional Appearance: A cohesive domain structure gives your business a more established and professional image
- Improved Conversion Rates: Reducing friction in the checkout process typically leads to higher conversion rates